|
||||
|
|
BitmapsIn this tutorial we'll learn how to load bitmaps from resources and from files, how to pass them around and blit them to the screen. We'll also see how to create and use an empty bitmap as a canvas, draw a picture on it and then blit it to the screen. Finally, we'll combine these techniques to write a simple program that uses double-buffering and timer messages to show a simple animation involving sprites. First of all, in most cases Windows provides storage for bitmaps and takes care of the formatting of bits. The programmer gets access to the bitmap through a handle, whose type is HBITMAP. (Remember to set the STRICT flag when compiling Windows programs, to make sure HBITMAP is a distinct type, rather than just a pointer to void.) Since a bitmap is a resource (in the Resource Management sense), the first step is to encapsulate it in a “strong pointer” type of interface. Notice the transfer semantics of the constructor and the overloaded assignment operator, characteristic of a resource that can have only one owner at a time. We instruct Windows to release the resources allocated to the bitmap by calling DeleteObject. class Bitmap { public: Bitmap() : _hBitmap (0) {} // Transfer semantics Bitmap(Bitmap& bmp) : _hBitmap(bmp.Release()) {} void operator=(Bitmap& bmp) { if (bmp._hBitmap != _hBitmap) { Free(); _hBitmap = bmp.Release(); } } HBITMAP Release() { HBITMAP h = _hBitmap; _hBitmap = 0; return h; } ~Bitmap() { Free(); } // implicit conversion for use with Windows API operator HBITMAP() { return _hBitmap; } protected: Bitmap(HBITMAP hBitmap) : _hBitmap(hBitmap) {} void Free() { if (_hBitmap) ::DeleteObject(_hBitmap); } HBITMAP _hBitmap; }; Now that the management issues are out of the way, we can concentrate on loading bitmaps. The simplest way to include a bitmap in your program is to add it to the resource file. In the resource editor of your development environment you can create new bitmaps or import them from external files. You can either give them names (strings) or numerical ids. When you want to access such a bitmap in your program you have to load it from the resources. Here are two methods that do just that. You have to give them a handle to the program instance. void Bitmap::Load(HINSTANCE hInst, char const * resName) { Free(); _hBitmap = (HBITMAP)::LoadImage(hInst, resName, IMAGE_BITMAP, 0, 0, LR_CREATEDIBSECTION); if (_hBitmap == 0) throw WinException("Cannot load bitmap from resources", resName); } void Bitmap::Load(HINSTANCE hInst, int id) { Free(); _hBitmap = (HBITMAP)::LoadImage(hInst, MAKEINTRESOURCE(id), IMAGE_BITMAP, 0, 0, LR_CREATEDIBSECTION); if (_hBitmap == 0) throw WinException("Cannot load bitmap from resources"); } Loading a bitmap directly from a file is also very simple and can be done using the same API, LoadImage. Remember, it will only work if the file is a Windows (or OS/2) bitmap — such files usually have the extension .bmp. There is no simple way of loading other types of graphics files, .gif, .jpg, .png, etc. You have to know their binary layout and decode them explicitly (there are other web sites that have this information). void Bitmap::Load(char* path) { Free(); _hBitmap = (HBITMAP)::LoadImage(0, path, IMAGE_BITMAP, 0, 0, LR_LOADFROMFILE); if(_hBitmap == 0) throw WinException("Cannot load bitmap from file", path); } Once you got hold of a bitmap, you may want to enquire about its dimensions. Here's how you do it. void Bitmap::GetSize(int& width, int& height) { BITMAP bm; ::GetObject(_hBitmap, sizeof(bm), &bm); width = bm.bmWidth; height = bm.bmHeight; } Finally, you might want to create an empty bitmap and fill it with your own drawings programmatically. You have to specify the dimensions of the bitmap and you have to provide a device context (Canvas) for which the bitmap is targeted. Windows will create a different type of bitmap when your target is a monochrome monitor or printer, and different when it's a graphics card set to True Color. Windows will create a bitmap that is compatible with the target device. Bitmap::Bitmap(Canvas& canvas, int dx, int dy) : _hBitmap (0) { CreateCompatible(canvas, dx, dy); } void Bitmap::CreateCompatible(Canvas& canvas, int width, int height) { Free(); _hBitmap = ::CreateCompatibleBitmap(canvas, width, height); } How do you display the bitmap on screen? You have to blit it. Blit stands for "block bit transfer" or something like that. When you blit a bitmap, you have to specify a lot of parameters, so we'll just encapsulate the blitting request in a separate object, the blitter. This is a very handy object that sets the obvious defaults for blitting, but at the same time lets you override each and any of them. A blitter transfers a rectangular area of the bitmap into a rectangular area of the screen. The meaning of various parameters is the following: • Source position: pixel coordinates of the upper left corner of the bitmap area, to be transferred. The default is the upper left corner of the bitmap. • Destination position: pixel coordinates within the target window of the upper left corner of the transferred area. The default is upper left corner of the window. • Area dimensions: the dimensions of the rectangular area to be transferred. The default is the dimensions of the bitmap. • Transfer mode. The way bitmap pixels are combined with existing window pixels. The default, SRCCOPY, copies the pixels over existing pixels. You may also specify more involved logical operations, like SRCAND (Boolean AND), SRCPAINT (Boolean OR), etc. (see your compiler's help on BitBlt). class Blitter { public: Blitter(Bitmap& bmp) : _bmp (bmp), _mode (SRCCOPY), _xDst (0), _yDst (0), _xSrc (0), _ySrc (0) { bmp.GetSize(_width, _height); } void SetMode(DWORD mode) { _mode = mode; } void SetDest(int x, int y) { _xDst = x; _yDst = y; } void SetSrc(int x, int y) { _xSrc = x; _ySrc = y; } void SetArea(int width, int height) { _width = width; _height = height; } // transfer bitmap to canvas void BlitTo(Canvas & canvas); private: Bitmap& _bmp; int _xDst, _yDst; int _xSrc, _ySrc; int _width, _height; DWORD _mode; }; The BlitTo method performs the transfer from the bitmap to the window (or printer) as described by its Canvas. void Blitter::BlitTo(Canvas& canvas) { // Create canvas in memory using target canvas as template MemCanvas memCanvas (canvas); // Convert bitmap to the format appropriate for this canvas memCanvas.SelectObject(_bmp); // Transfer bitmap from memory canvas to target canvas ::BitBlt(canvas, _xDst, _yDst, _width, _height, memCanvas, _xSrc, _ySrc, _mode); } The API, BitBlt, transfers bits from one device to another. That's why we have to set up a fake source device. This "memory canvas" is based on the actual canvas--in this case we use target canvas as a template. So, for instance, if the target canvas describes a True Color device, our MemCanvas will also behave like a True Color device. In particular, when our bitmap is selected into it, it will be converted to True Color, even if initially it was a monochrome or a 256-color bitmap. The simplest program that loads and displays a bitmap might look something like this: There is a View object that contains a bitmap (I assume that the file "picture.bmp" is located in the current directory). It blits it to screen in the Paint method. class View { public: View() { _background.Load("picture.bmp"); } void Paint(Canvas& canvas) { Blitter blitter(_background); blitter.BlitTo(canvas); } private: Bitmap _background; }; A sprite is an animated bitmap that moves over some background. We already know how to display bitmaps — we could blit the background first and then blit the sprite bitmap over it. This will work as long as the sprite is rectangular. If you want to be more sophisticated and use a non-rectangular sprite, you need a mask. The two pictures below are that of a sprite (my personal pug, Fanny) and its mask. The mask is a monochrome bitmap that has black areas where we want the sprite to be transparent. The sprite, on the other hand, must be white in these areas. What we want is to be able to see the background through these areas.   The trick is to first blit the background, then blit the mask using logical OR, and then blit the sprite over it using logical AND. ORing a black mask pixel (all zero bits) with a background pixel will give back the background pixel. ORing a white mask pixel (all one bits) with a background will give a white pixel. So after blitting the mask, we'll have a white ghost in the shape of our sprite floating over the background. 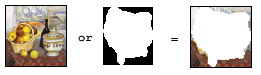 ANDing a white sprite pixel (all ones) with a background pixel will give back the background pixel. ANDing a non-white sprite pixel with the white (all ones) background (the ghost from previous step) will give the sprite pixel. We'll end up with the sprite superimposed on the background. 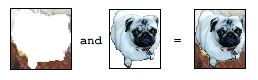 What remains is to implement the animation. The naive implementation would be to keep re-drawing the image: background, mask and sprite, changing the position of the mask and the sprite in each frame. The problem with this approach is that it results in unacceptable flutter. The trick with good animation is to prepare the whole picture off-line, as a single bitmap, and then blit it to screen in one quick step. This technique is called double buffering — the first buffer being the screen buffer, the second one — our bitmap. We'll also use Windows timer to time the display of frames. class WinTimer { public: WinTimer(HWND hwnd = 0, int id = -1) : _hwnd (hwnd), _id (id) {} void Create(HWND hwnd, int id) { _hwnd = hwnd; _id = id; } void Set(int milliSec) { ::SetTimer(_hwnd, _id, milliSec, 0); } void Kill() { ::KillTimer(_hwnd, _id); } int GetId() const { return _id; } private: HWND _hwnd; int _id; }; We'll put the timer in our Controller object and initialize it there. class Controller { public: Controller(HWND hwnd, CREATESTRUCT* pCreate); ~Controller(); void Timer(int id); void Size(int x, int y); void Paint(); void Command(int cmd); private: HWND _hwnd; WinTimer _timer; View _view; }; Controller::Controller(HWND hwnd, CREATESTRUCT * pCreate) : _hwnd (hwnd), _timer (hwnd, 1), _view(pCreate->hInstance) { _timer.Set (100); } Once set, the timer sends our program timer messages and we have to process them. LRESULT CALLBACK MainWndProc(HWND hwnd, UINT message, WPARAM wParam, LPARAM lParam) { Controller* pCtrl = WinGetLong<Controller*>(hwnd); switch (message) { ... case WM_TIMER: pCtrl->Timer(wParam); return 0; ... } return ::DefWindowProc(hwnd, message, wParam, lParam); } void Controller::Timer(int id) { _timer.Kill(); _view.Step(); UpdateCanvas canvas(_hwnd); _view.Update(canvas); ::InvalidateRect(_hwnd, 0, FALSE); _timer.Set(50); } void Controller::Paint() { PaintCanvas canvas(_hwnd); _view.Paint(canvas); } The Update method of View is the workhorse of our program. It creates the image in the buffer. We then call InvalidateRectangle to force the repaint of our window (the last parameter, FALSE, tells Windows not to clear the previous image — we don't want it to flash white before every frame). Here's the class View, with the three bitmaps. class View { public: View(HINSTANCE hInst); void SetSize(int cxNew, int cyNew) { _cx = cxNew; _cy = cyNew; } void Step() { ++_tick; } void Update(Canvas& canvas); void Paint(Canvas& canvas); private: int _cx, _cy; int _tick; Bitmap _bitmapBuf; // for double buffering Bitmap _background; int _widthBkg, _heightBkg; Bitmap _sprite; Bitmap _mask; int _widthSprite, _heightSprite; }; View::View(HINSTANCE hInst) : _tick (0) { // Load bitmap from file _background.Load("picture.bmp"); // Load bitmap from resource _background.GetSize(_widthBkg, _heightBkg); // Load bitmaps from resources _sprite.Load(hInst, IDB_FANNY); _mask.Load(hInst, IDB_MASK); _sprite.GetSize(_widthSprite, _heightSprite); DesktopCanvas canvas; _bitmapBuf.CreateCompatible(canvas, 1, 1); _cx = 1; _cy = 1; } And here's the implementation of Update. We create a bitmap canvas in memory, making it compatible with the current display canvas. We blit the background image into it, then blit the mask and the sprite (notice the change of position for each frame). Finally, we transfer the complete bitmap into our buffer (overloaded assignment operator at work!). void View::Update(Canvas& canvas) { const double speed = 0.01; Bitmap bmp(canvas, _cx, _cy); BitmapCanvas bmpCanvas(canvas, bmp); RECT rect = { 0, 0, _cx, _cy }; bmpCanvas.WhiteWash(rect); // Do the off-line drawing Blitter bltBkg(_background); bltBkg.BlitTo(bmpCanvas); int xRange = (_widthBkg - _widthSprite) / 2; int yRange = (_heightBkg - _heightSprite) / 2; int x = xRange + static_cast<int>(xRange * sin(speed * _tick)); int y = yRange + static_cast<int>(yRange * cos(4 * speed * _tick)); Blitter bltMask(_mask); bltMask.SetMode(SRCPAINT); bltMask.SetDest(x, y); bltMask.BlitTo(bmpCanvas); Blitter bltSprite(_sprite); bltSprite.SetMode(SRCAND); bltSprite.SetDest(x, y); bltSprite.BlitTo(bmpCanvas); // update the buffer _bitmapBuf = bmp; } For completeness, here's the definition of bitmap canvas. You draw directly on this canvas using standard canvas methods, like Line, Text, SetPixel, etc... Here we only blit bitmaps into it. class BitmapCanvas: public MemCanvas { public: BitmapCanvas(HDC hdc, HBITMAP hBitmap) : MemCanvas(hdc) { // convert bitmap to format compatible with canvas _hOldBitmap = reinterpret_cast(::SelectObject(_hdc, hBitmap)); } ~BitmapCanvas() { ::SelectObject(_hdc, _hOldBitmap); } private: HBITMAP _hOldBitmap; }; class MemCanvas: public Canvas { public: MemCanvas(HDC hdc) : Canvas(::CreateCompatibleDC(hdc)) {} ~MemCanvas() { ::DeleteDC(_hdc); } }; Now, if you want more speed, read about DirectDraw. |
|
||
|
Главная | В избранное | Наш E-MAIL | Добавить материал | Нашёл ошибку | Наверх |
||||
|
|
||||